The Fun of Coding a Discord Bot
Hello, everyone! Today's post is all to do with my Discord Bot and how I made it. If you haven't already joined my Discord Server, a) You Should and b) you won't have seen my Bot.
On the server, I have made a bot which can do a few fun things and fills in for my friend David. For example, typing /xkcd would show you the latest xkcd comic. You can also update Davvo's game and eventually, I will be adding a /weather module for him. Now for a little guide on creating your own bot:
Step 1: Setting Up
First of all, I will assume that you have a basic level of JS knowledge, and that you know how to use Discord.
When creating a bot on Discord, you need to do a few things. First of all you have to create a bot user, which you can do here. You'll want to go ahead and create a new app. You'll want to give it a name like Super Bot and give it an icon, much like a user profile icon. Once you've done that, go ahead and finish creating your bot.
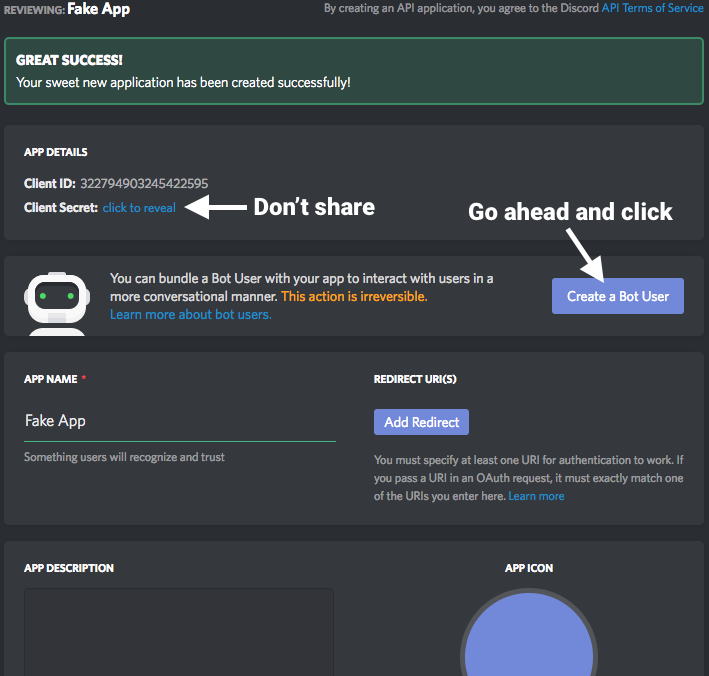
You'll then see a page like this with lots of useful information:
 Go ahead and click Create a Bot User and then copy the token.
After that, you'll need to invite the bot to your server by hand, using this URL (replacing CLIENT_ID with your ID). https://discordapp.com/oauth2/authorize?client_id=CLIENT_ID&scope=bot&permissions=1341643969. Then add the bot to your server and you're good to go.
Now that you have a Bot setup on the website, you can go ahead and start your text editor and a terminal window.
First, create a folder for your bot where you can store all of your code and then cd into your bot's directory (e.g. cd ~/Coding/Discord Bot). From there, you'll want to type npm init to create your node package. Just hit enter through all prompts.
After that, you'll need to grab the Discord.js module by doing npm install discord.js --save to get the package and save it to package.json. After that, we can create our files.
Create 2 files, 1 called settings.json and one called index.js. We'll be putting all of the tokens etc in the JSON file and all of the functionality in the JS file.
in your settings.json, add the following:
index.js where you can copy and paste this code:
const Discord = require("discord.js");
const client = new Discord.Client();
const settings = require("./settings.json");

client.on("ready", () => {
  console.log("Staring Bot...");
  client.user.setGame(settings.status);
});

client.on("message", message => {
  // We'll put some stuff here later...
  return;
});

client.login(settings.discord_token);
Step 2: Adding Functionality
So, it's all well and good that you now have a working bot, but it doesn't do anything! In this section we'll cover some basic things you can do with your bot (you might want to open this to help you).
First of all, a ping. Where the code currently returns in the client.on("message"...)
Next, we want to add a response, so, for example, when the message is equal to "ping", we'll want to send "pong".
This can be setup fairly easily with the usage of messsage.content = "ping" in an if statement. We then use the message.reply() method to reply and the result we get will look something like this:-
client.on("message", message => {
  if(message.content === "ping") {
  // Checks to see if the message content is "ping"
    message.reply("pong");
    // Replies to the user with "pong".
  };
});
Step 3: Virtually Infinite
The previous section just covers 1 basic bit of functionality and the possibilities are virtually infinite. For example, you can add a dice roller fairly easily, by using the following code:-
function getRandomInt(min, max) {
// A function to get a random integer...
  return Math.floor(Math.random() * (max - min + 1)) + min;
}

if(message.content === "/roll") {
// Checks for a "roll" command
  message.channel.send(getRandomInt(1, 6));
}
I also coded an xkcd command to get the latest xkcd and display it nicely (you'll need another node module called requestify which you can get by using the command npm install --save requestify):-
const requestify = require('requestify');
// Imports the node module.

if(message.content === "/xkcd") {
  requestify.get('https://xkcd.com/info.0.json').then(function(response) {
  // Gets the latest XKCD in a JSON format.
    var pr = response.getBody();
    // Gets the body of the response and parses it as JSON.
    const embed = new Discord.RichEmbed();
      embed.setTitle(pr.safe_title);
      embed.setDescription(pr.alt);
      embed.setFooter('This XKCD was brought to you by Davvo', 'http://charliebritton.me/IMG_0057.JPG');
      embed.setColor([255, 0, 0]);
      embed.setImage(pr.img);

    message.channel.send({embed});

  });

}
Conclusion
Thanks for reading my blog post on how to create a Discord bot. I hope you found it useful and informative. If you have any questions, Tweet me @charliebrittdev or have a look at the official discord.js site.